
JS Event Propagation
Welcome to another tutorial, here you will learn how events propagate in the DOM tree in JavaScript.
Understanding the Event Propagation
Event propagation is a system that defines how events propagate or travel through the Document Object Model (DOM) tree to arrive at their target and what happens to them afterward.
Take a look at this illustration, suppose you have assigned a click event handler on a hyperlink (i.e <a> element) which is nested inside a paragraph (i.e <p> element). So, when you click on that link, the handler will be executed. However, if you assign the click event handler to the paragraph containing the link, instead of the link itself, then even in this case, clicking the link will still trigger the handler. This is because the events don't just affect the target element that generated the event; they travel up and down through the DOM tree to reach their target. This process is known as event propagation.
In recent browsers, event propagation proceeds in two phases: capturing, and a bubbling phase. Take a look at the illustration below:
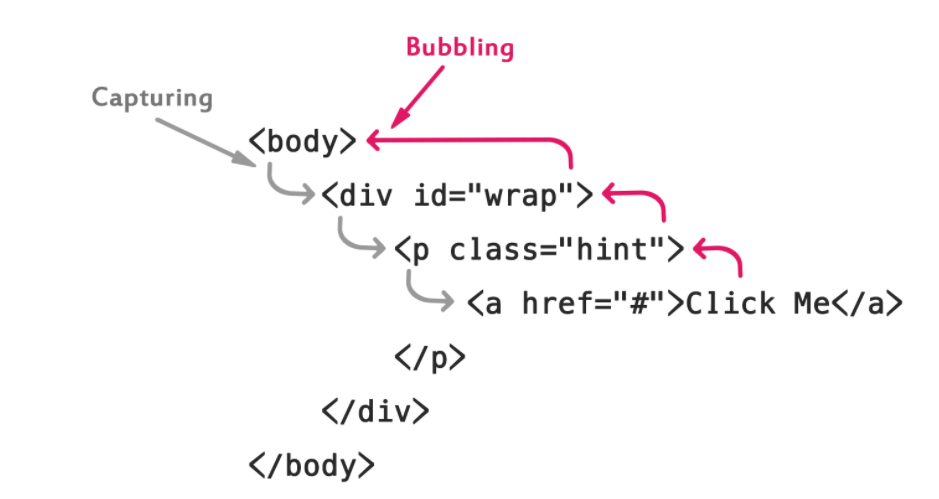
The image above illustrates how an event travels in the DOM tree during various phases of the event propagation when an event is fired on an element that has parent elements.
The concept of event propagation was introduced to handle the situations that require multiple elements in the DOM hierarchy with a parent-child relationship to have event handlers for the same event, like a mouse click. Therefore, the question here is which element's click event will be handled first when the user clicks on the inner element; is it the click event of the outer element, or the inner element.
In subsequent sections of this tutorial, we will discuss each phase of the event propagation in greater detail and find out the answer to this question.
Note: In general there are 3 phases; capture, target, and bubble phase. However, the 2nd phase (i.e the target phase) occurs when the event arrives at the target element that has generated the event and is not handled separately in modern browsers, handlers registered for both capturing and bubbling phases are executed in this phase.
The Capturing Phase
In the capturing phase, events are usually propagated from the Window down through the DOM tree to the target node. For instance, when a user clicks a hyperlink, that click event would pass through the <html> element, the <body> element, and the <p> element containing the link. Also in the case where any ancestor (i.e parent, grandparent, etc.) of the target element and the target itself has a specially registered capturing event listener for that type of event, the concerned listeners are executed during this phase. This is shown in the example below:
<!DOCTYPE html>
<html lang="en">
<head>
<meta charset="utf-8">
<title>Event Capturing Demo</title>
<style type="text/css">
    div, p, a{
        padding: 15px 30px;
        display: block;
        border: 2px solid #000;
        background: #fff;
    }
</style>
</head>
<body>
<div id="wrap">DIV
    <p class="hint">P
        <a href="#">A</a>
    </p>
</div>

<script>
    function showTagName() {
        alert("Capturing: "+ this.tagName);
    }

    var elems = document.querySelectorAll("div, p, a");
    for(let elem of elems) {
        elem.addEventListener("click", showTagName, true);
    }
</script>
</body>
</html>
The example above demonstrate the event capturing works. You can click on any element and observe in which order alert pop-ups appear.
Event capturing is rarely used and is not supported in all browsers. For example, Internet Explorers before version 9.0 does not support event capturing.
More so, event capturing only works with event handlers that are registered with the addEventListener() method when the third argument is set to true. The traditional method such as using onclick, onmouseover, etc to assign event handlers, won't work here. Please check out the JavaScript event listeners tutorial to learn more about Event listeners.
The Bubbling Phase
In this phase, the exact opposite of the first phase occurs. Here the event propagates or bubbles back up the DOM tree, from the target element up to the Window, and then visits all of the ancestors of the target element one after the other. For instance, when the user clicks a hyperlink, that click event would pass through the <p> element containing the link, the <body> element, the <html> element, and the document node.
If any ancestor of the target itself and the target element has event handlers assigned for that type of event, these handlers are executed during this phase. In recent browsers, all event handlers are registered in the bubbling phase, and it is by default. Check out this example:
<!DOCTYPE html>
<html lang="en">
<head>
<meta charset="utf-8">
<title>Event Bubbling Demo</title>
<style type="text/css">
    div, p, a{
        padding: 15px 30px;
        display: block;
        border: 2px solid #000;
        background: #fff;
    }
</style>
</head>
<body>
<div onclick="alert('Bubbling: ' + this.tagName)">DIV
    <p onclick="alert('Bubbling: ' + this.tagName)">P
        <a href="#" onclick="alert('Bubbling: ' + this.tagName)">A</a>
    </p>
</div>
</body>
</html>
The example above shows you how event bubbling works. You can click on any element and observe in which order alert pop-ups appear.
This second phase event handler ( i.e. Event bubbling) is supported in all browsers, and it works for all handlers, regardless of how they are registered (e.g. using onclick or addEventListener()) except they are registered as capturing event listeners. This is the reason why the term event propagation is often used as a synonym for event bubbling.
Accessing the Target Element
The DOM node is the target element that has generated the event. For instance, when the user clicks a hyperlink, the target element is the hyperlink.
The event.target is used to access the target element, and it doesn't change through the event propagation phases. In addition, this keyword represents the current element (i.e an element that has an actively running handler attached to it). It is illustrated in the example below:
<!DOCTYPE html>
<html lang="en">
<head>
<meta charset="utf-8">
<title>Event Target Demo</title>
<style type="text/css">
    div, p, a{
        padding: 15px 30px;
        display: block;
        border: 2px solid #000;
        background: #fff;
    }
</style>
</head>
<body>
<div id="wrap">DIV
    <p class="hint">P
        <a href="#">A</a>
    </p>
</div>

<script>
    // Selecting the div element
    var div = document.getElementById("wrap");

    // Attaching an onclick event handler
    div.onclick = function(event) {
        event.target.style.backgroundColor = "lightblue";

        // Let the browser finish rendering of background color before showing alert
        setTimeout(() => {
            alert("target = " + event.target.tagName + ", this = " + this.tagName);
            event.target.style.backgroundColor = ''
        }, 0);
    }
</script>
</body>
</html>
Below is an illustration that we have created utilizing the above example. First, click on any element and it will show you the tag name of the target element and the current element.
This fat arrow sign’=>’ used in the example above is an arrow function expression, It has a shorter syntax than a function expression, and makes this keyword behave properly. Please, learn more about the features of the arrow function, and check the tutorial on ES6.
Stopping the Event Propagation
Do you know that you can also stop event propagation in the middle if you want to prevent any ancestor element's event handlers from being notified about the event. Take, for instance, you have nested elements and each element has onclick event handler that displays an alert dialog box. It's usual, that when you click on the inner element all handlers will be executed at once, since the event bubble up to the DOM tree.
<!DOCTYPE html>
<html lang="en">
<head>
<meta charset="utf-8">
<title>Event Propagation Demo</title>
<style type="text/css">
    div, p, a{
        padding: 15px 30px;
        display: block;
        border: 2px solid #000;
        background: #fff;
    }
</style>
</head>
<body>
<div id="wrap">DIV
    <p class="hint">P
        <a href="#">A</a>
    </p>
</div>

<script>
    function showAlert() {
        alert("You clicked: "+ this.tagName);
    }

    var elems = document.querySelectorAll("div, p, a");
    for(let elem of elems) {
        elem.addEventListener("click", showAlert);
    }
</script>
</body>
</html>
See this little demonstration from the example above; when you click on any child element, event handlers on parent elements are also executed and you may see multiple alert boxes.
In other to prevent this situation from continuing, you can stop an event from bubbling up the DOM tree using the event.stopPropagation() method. In the example below, clicking event listener on the parent elements will not execute if you click on the child elements.
<!DOCTYPE html>
<html lang="en">
<head>
<meta charset="utf-8">
<title>Stop Event Propagation Demo</title>
<style type="text/css">
    div, p, a{
        padding: 15px 30px;
        display: block;
        border: 2px solid #000;
        background: #fff;
    }
</style>
</head>
<body>
<div id="wrap">DIV
    <p class="hint">P
        <a href="#">A</a>
    </p>
</div>

<script>
    function showAlert(event) {
        alert("You clicked: "+ this.tagName);
        event.stopPropagation();
    }

    var elems = document.querySelectorAll("div, p, a");
    for(let elem of elems) {
        elem.addEventListener("click", showAlert);
    }
</script>
</body>
</html>
Below is the updated demonstration. So here, if you click on any child element only one alert will appear.
More so, you can even prevent any other listeners attached to the same element for a similar event type from being executed by making use of the stopImmediatePropagation() method.
In the example below, we've attached multiple listeners to the hyperlink, however, only one listener for the hyperlink will execute when you click the link, and you will see only one alert.
<!DOCTYPE html>
<html lang="en">
<head>
<meta charset="utf-8">
<title>Stop Immediate Propagation Demo</title>
<style type="text/css">
    div, p, a{
        padding: 15px 30px;
        display: block;
        border: 2px solid #000;
        background: #fff;
    }
</style>
</head>
<body>
<div onclick="alert('You clicked: ' + this.tagName)">DIV
    <p onclick="alert('You clicked: ' + this.tagName)">P
        <a href="#" id="link">A</a>
    </p>
</div>

<script>
    function sayHi() {
        alert("Hi, there!");
        event.stopImmediatePropagation();
    }
    function sayHello() {
        alert("Hello World!");
    }

    // Attaching multiple event handlers to hyperlink
    var link = document.getElementById("link");
    link.addEventListener("click", sayHi);
    link.addEventListener("click", sayHello);
</script>
</body>
</html>
Note: In the case where numerous listeners are attached to the same element for the same event type, they are executed in the order in which they have been added. However, if any listener calls the event.stopImmediatePropagation() method, no remaining listeners will be executed.
Preventing the Default Action
Most events have a default action associated with them, for example, if you click on a link browser, it takes you to the link's target; when you click on a form submit button, the browser submits the form; etc. However, can prevent such default actions with the use of the preventDefault() method of the event object.
But, you should know that preventing the default actions does not stop event propagation; the event continues to propagate to the DOM tree as usual. Below is an example:
<!DOCTYPE html>
<html lang="en">
<head>
<meta charset="utf-8">
<title>Prevent Default Demo</title>
</head>
<body>
<form action="/examples/html/action.php" method="post" id="users">
    <label>First Name:</label>
    <input type="text" name="first-name" id="firstName">
    <input type="submit" value="Submit" id="submitBtn">
</form>

<script>
    var btn = document.getElementById("submitBtn");

    btn.addEventListener("click", function(event) {
        var name = document.getElementById("firstName").value;
        alert("Sorry, " + name + ". The preventDefault() won't let you submit this form!");
        event.preventDefault(); // Prevent form submission
    });
</script>
</body>
</html>