• Home
  • HTML
    • HTML Introduction
    • HTML Basic
    • HTML Elements
    • HTML Attributes
    • HTML Headings
    • HTML Paragraphs
    • HTML Text Formatting
    • HTML Styles
    • HTML Comments
    • HTML Styles - CSS
    • HTML Links
    • HTML Images
    • HTML Tables
    • HTML Lists
    • HTML Block and Inline Elements
    • HTML class Attribute
    • HTML Forms
    • HTML Media
  • CSS
    • Introduction of CSS
    • CSS Syntax
    • CSS Selectors
    • How To Add CSS
    • CSS Comments
    • CSS Colors
    • CSS Backgrounds
    • CSS Borders
    • CSS Margins
    • CSS Text
    • CSS Lists
    • CSS Tables
    • CSS Box Model
    • CSS Dimension
    • CSS Padding
    • CSS Border
    • CSS Margin
    • CSS Outline
    • CSS Cursors
    • CSS Overflow
    • CSS Units
    • CSS Visual Formatting
    • CSS Display
    • CSS Visibility
    • CSS Position
    • CSS Layers
    • CSS Float
    • CSS Alignment
    • CSS Pseudo-classes
    • CSS Pseudo-elements
    • CSS Media Types
    • CSS Sprites
    • CSS Opacity
    • CSS Attribute Selectors
    • CSS Validation
    • CSS3 Border
    • CSS3 Gradients
    • CSS3 Text Overflow
  • JavaScript
    • JS Introduction
    • JS Getting Started
    • JS Syntax
    • JS Variables
    • JS Generating Output
    • JS Data Types
    • JS Operators
    • JS Events
    • JS Strings
    • JS Numbers
    • JS If Else
    • JS Switch Case
    • JS Arrays
    • JS Sorting Arrays
    • JS Loops
    • JS Functions
    • JS Objects
    • JS DOM Nodes
    • JS DOM Selectors
    • JS DOM Styling
    • JS DOM Get Set Attributes
    • JS DOM Manipulation
    • JS DOM Navigation
    • JS Window
    • JS Screen
    • JS Location
    • JS History
    • JS Navigator
    • JS Dialog Boxes
    • JS Timers
    • JS Date and Time
    • JS Math Operations
    • JS Type Conversions
    • JS Event Listeners
    • JS Event Propagation
    • JS Borrowing Methods
    • JS Hoisting Behavior
    • JS Closures
    • JS Strict Mode
    • JS JSON Parsing
    • JS Error Handling
    • JS Regular Expressions
    • JS Form Validation
    • JS Cookies
    • JS AJAX Requests
    • JS ES6 Features
  • jQuery
    • jQuery Introduction
    • jQuery Syntax
    • jQuery Selectors
    • jQuery Events
    • jQuery Show/Hide
    • jQuery Fade
    • jQuery Slide
    • jQuery Animation
    • jQuery Stop
    • jQuery Chaining
    • jQuery Callback
    • jQuery Get/Set
    • jQuery Insert
    • jQuery Remove
    • jQuery CSS Classes
    • jQuery Style Properties
    • jQuery Dimensions
    • jQuery Traversing
    • jQuery Ancestors
    • jQuery Descendants
    • jQuery Siblings
    • jQuery Filtering
    • jQuery Ajax
    • jQuery Load
    • jQuery Get/Post
    • jQuery No-Conflict
  • PHP
    • PHP Introduction
    • PHP Install
    • PHP Syntax
    • PHP Comments
    • PHP Variables
    • PHP Echo / Print
    • PHP Data Types
    • PHP Strings
    • PHP Constants
    • PHP Operators
    • PHP If...Else...Elseif
    • PHP Switch
    • PHP Loops
    • PHP Functions
    • PHP Arrays
    • PHP Superglobals
    • PHP Date and Time
    • PHP Include
    • PHP File Handling
    • PHP File Upload
    • PHP Cookies
    • PHP Sessions
    • PHP Filters
    • PHP Callback Functions
    • PHP JSON
    • PHP Exceptions
    • PHP What is OOP
    • PHP Classes/Objects
    • PHP Constructor
    • PHP Destructor
    • PHP Access Modifiers
    • PHP Inheritance
    • PHP Abstract Classes
    • PHP Interfaces
    • PHP Traits
    • PHP Static Methods
    • PHP Namespaces
  • SQL
    • Introduction to SQL
    • SQL Create Command
    • SQL ALTER Command
    • SQL Truncate Drop Rename
    • INSERT SQL command
    • UPDATE SQL command
    • DELETE SQL command
    • SQL COMMIT command
    • SQL ROLLBACK command
    • SQL GRANT and REVOKE Command
    • SQL WHERE clause
    • SQL LIKE clause
    • SQL ORDER BY Clause
    • SQL Group By Clause
    • SQL HAVING Clause
    • SQL DISTINCT keyword
    • SQL AND OR operator
    • SQL Constraints
    • SQL Functions
    • SQL JOIN
  • Python
    • Getting started with Python
    • Introduction to IDLE
    • Python 2.x vs. Python 3.x
    • Syntax Rules and First Program
    • Numbers and Math Functions
    • Python Operators
    • Python Variables
    • Python Modules and Functions
    • Python Input and Output
    • Data Types in Python
    • String in Python
    • String Functions in python
    • Lists in Python
    • Utilizing List Elements by Iterating
    • Deleting List Elements & other Functions
    • Dictionaries in Python
    • Functions for Dictionary
    • Tuples in Python
    • Relational and Logical Operators
    • Conditional Statements in Python
    • Looping in Python
    • Define Functions in Python
    • Python-Introduction to OOP
    • Object Oriented Programming in Python
    • Classes in Python
    • The concept of Constructor
    • Destructors - Destroying the Object in Python
    • Inheritance in Python
    • Access Modifers in Python
    • Types of Inheritance
    • Method Overriding in Python
    • Polymorphism
    • static Keyword
    • Operator Overloading Python
    • Introduction to Error Handling
    • Exception Handling: try and except
    • Exeption Handling: finally
    • Exception Handling: raise
    • File Handling
    • Reading and Writing File
    • Introduction to Multithreading
    • Threading Module in Python
    • Thread Object
    • Lock Object
    • RLock Object
    • Event Object
    • Timer Object
    • Condition Object
    • Barrier Object
    • __name__ Variable in Python
    • Iterable and Iterator
    • yield Keyword
    • Python Generators
    • Python Closures
    • Python Decorators
    • @property Decorator in Python
    • Assert Statement
    • Garbage Collection
    • Shallow and Deep Copy
    • Introduction to Logging
    • Configure Log LEVEL, Format etc
    • Python Logging in a file
    • Python Logging Variable Data
    • Python Logging Classes and Functions
    • Python MySQL Introduction
    • Create Database - Python MySQL
    • Create Table - Python MySQL
    • Insert Data in Table
    • Select Data from Table
    • Update data in Table
    • Delete data from Table
    • Drop Table from Database
    • WHERE clause - Python MySQL
    • Order By clause - Python MySQL
    • Limit clause - Python MySQL
    • Table Joins - Python MySQL
  • MongoDB
    • MongoDB Introduction
    • Overview of MongoDB
    • MongoDB vs SQL Databases
    • Advantages of MongoDB
    • When to go for MongoDB
    • Data Modelling in MongoDB
    • Is MongoDB really Schemaless?
    • Installing MongoDB on Windows and Linux
    • Datatypes in MongoDB
    • Create and Drop Database in MongoDB
    • MongoDB: Creating a Collection
    • CRUD Operations in MongoDB
    • Data Relationships in MongoDB
    • Indexing in MongoDB
    • Sorting in MongoDB
    • Aggregation in MongoDB
    • Data Backup and Restoration in MongoDB
    • Sharding in MongoDB
    • Java Integration with MongoDB
  • Elixir
    • Elixir Overview
    • Elixir Environment
    • Elixir Basic Syntax
    • Elixir Data Types
    • Elixir Variables
    • Elixir Operators
    • Elixir Pattern Matching
    • Elixir Decision Making
    • Elixir Strings
    • Elixir Char Lists
    • Elixir Lists and Tuples
    • Elixir Keyword Lists
    • Elixir Maps
    • Elixir Modules
    • Elixir Aliases
    • Elixir Functions
    • Elixir Recursion
    • Elixir Loops
    • Elixir Enumerables
    • Elixir Streams
    • Elixir Structs
    • Elixir Protocols
    • Elixir File I/O
    • Elixir Processes
    • Elixir Sigils
    • Elixir Comprehensions
    • Elixir Typespecs
    • Elixir Behaviours
    • Elixir Errors Handling
    • Elixir Macros
    • Elixir Libraries
  • TypeScript
    • TypeScript Overview
    • Install TypeScript
    • First TypeScript Program
    • Type Annotation
    • TypeScript Variable
    • TypeScript Data Type Number
    • TypeScript Data Type String
    • TypeScript Data Type Boolean
    • TypeScript Arrays
    • TypeScript Tuples
    • TypeScript Enum
    • TypeScript Union
    • TypeScript Any Data Type
    • TypeScript Void Data Type
    • TypeScript Never Data Type
  • Home
  • Introduction of CSS
  • CSS Syntax
  • CSS Selectors
  • How To Add CSS
  • CSS Comments
  • CSS Colors
  • CSS Backgrounds
  • CSS Borders
  • CSS Margins
  • CSS Text
  • CSS Lists
  • CSS Tables
  • CSS Box Model
  • CSS Dimension
  • CSS Padding
  • CSS Border
  • CSS Margin
  • CSS Outline
  • CSS Cursors
  • CSS Overflow
  • CSS Units
  • CSS Visual Formatting
  • CSS Display
  • CSS Visibility
  • CSS Position
  • CSS Layers
  • CSS Float
  • CSS Alignment
  • CSS Pseudo-classes
  • CSS Pseudo-elements
  • CSS Media Types
  • CSS Sprites
  • CSS Opacity
  • CSS Attribute Selectors
  • CSS Validation
  • CSS3 Border
  • CSS3 Gradients
  • CSS3 Text Overflow
Home >> css >> CSS Sprites

CSS Sprites


CSS sprites technique reduces the number of HTTP requests made for image resources. It combines multiple file images in a single file.


What is a Sprite

These are two-dimensional images that are made up by combining small images into one larger image at specified X and Y coordinates.

You can use the CSS background-position property for defining the exact position of the image to be displayed for displaying a single image from the combined image.


Advantage of Using CSS Image Sprite

A web page with several images, particularly several small ones, like buttons, icons, etc., can take longer to load and generate multiple server requests.

The use of image sprites rather than separate images will significantly decrease the number of HTTP requests a browser will make to the server. As a result, image sprites can effectively improve the web pages loading time and overall website performance.

Note: Response time makes a web page more responsive for the user, and reducing the HTTP requests has a significant impact on reducing response time.


See the following examples, and you will notice one visible difference; when the mouse pointer is placed over the browser icons in the non-sprite version for the very first time, the hover image appears after some time. The reason is that the hover picture is loaded from the server on mouse hover because the hover and normal images are two different images. In contrast, in the image sprite version, the hover image is displayed immediately on the hover of a mouse, resulting in a smooth hover effect because all images are combined in a single image.


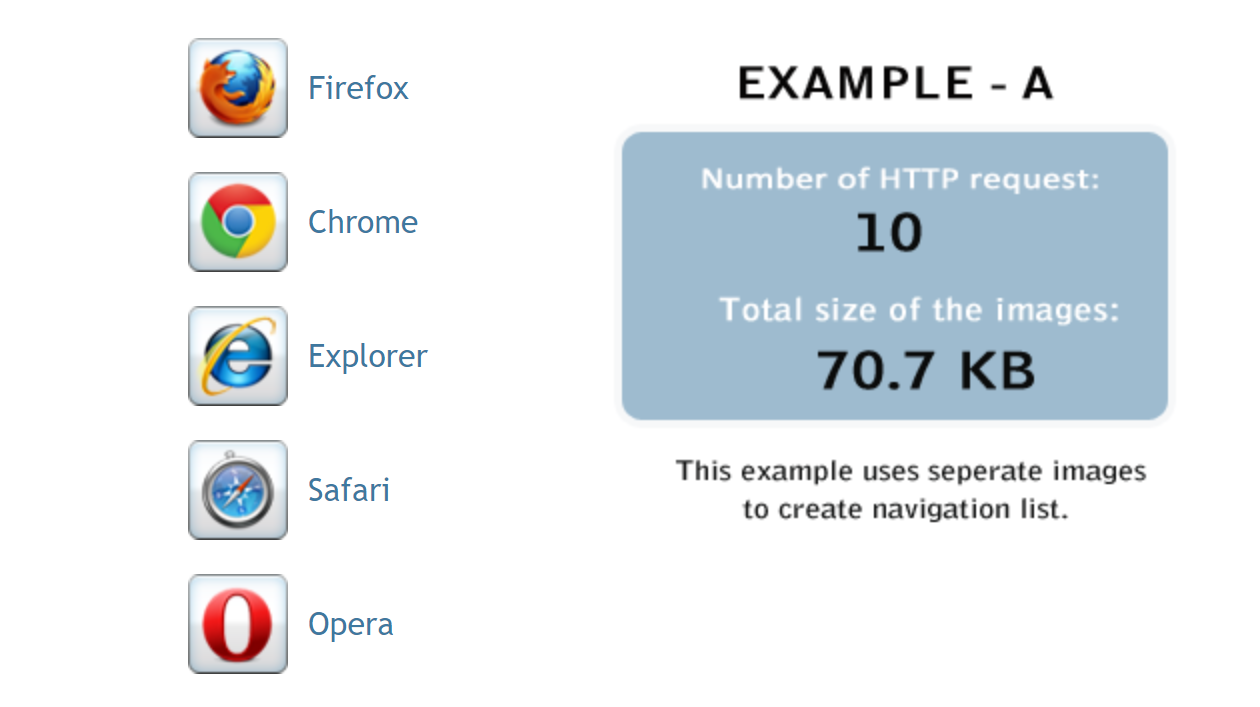
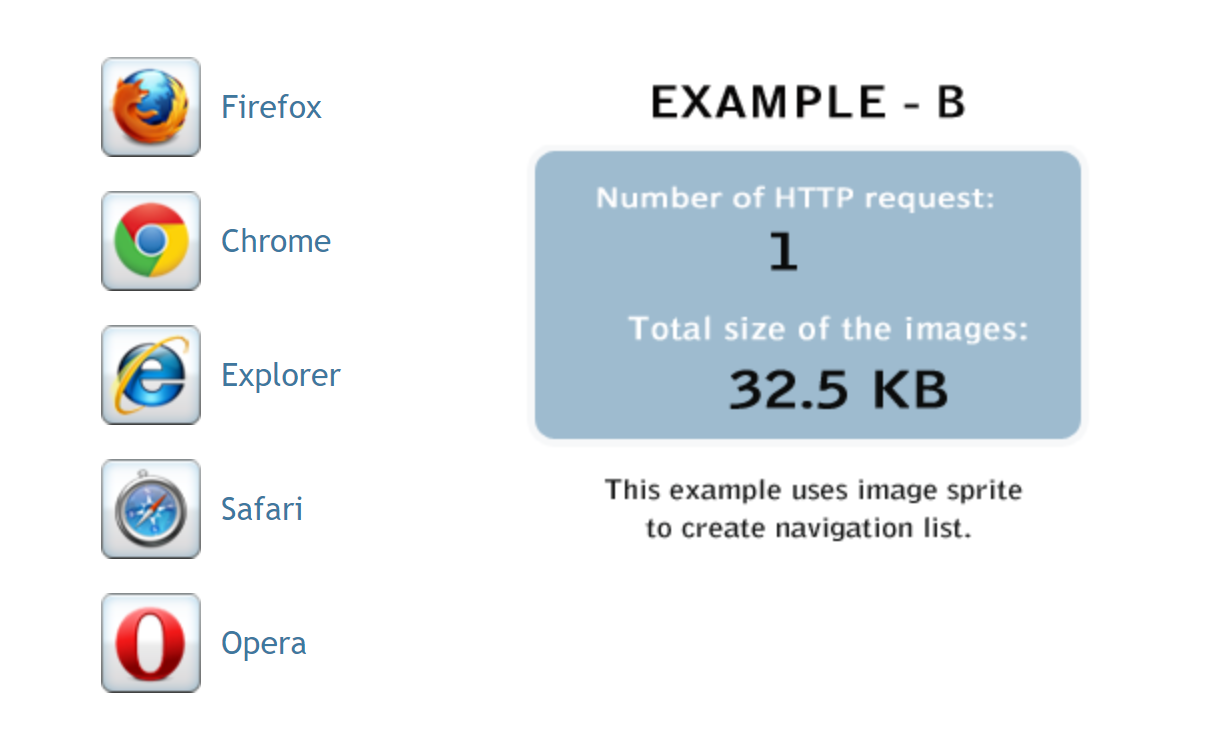
With the use of the CSS sprite technique illustrated in the: [EXAMPLE - B], you will be able to reduce the HTTP requests number by nine and the images' total file size by 38.2 KB in comparison to the [EXAMPLE - A];. It's a significant improvement in such an example. So think what you can do on the whole website. 

In the section below, the entire process of creating this example has been explained below.


Making the Image Sprite

To make this sprite image, ten separate images were combined in a single image (mySprite.png). Of course, you can use any image editing tool you like to create your own sprite.


Tip: For convenience, all icons of the same size were used and were placed close to each other to calculate the offset easily.


Display an Icon from Image Sprite

Finally, using CSS, you can display just the part of an image sprite you need. 

Firstly, you will create the class .sprite that will load your sprite image. It is for avoiding repetition since all items share the same background-image.

Example :

.sprite {
    background: url("images/mySprite.png") no-repeat;
}

Now, you must define a class for each item you want to display. For example, for displaying the Internet Explorer icon form the image sprite, the CSS code would be.

Example :

.ie {
    width: 50px; /* Icon width */
    height: 50px; /* Icon height */
    display: inline-block; /* Display icon as inline block */
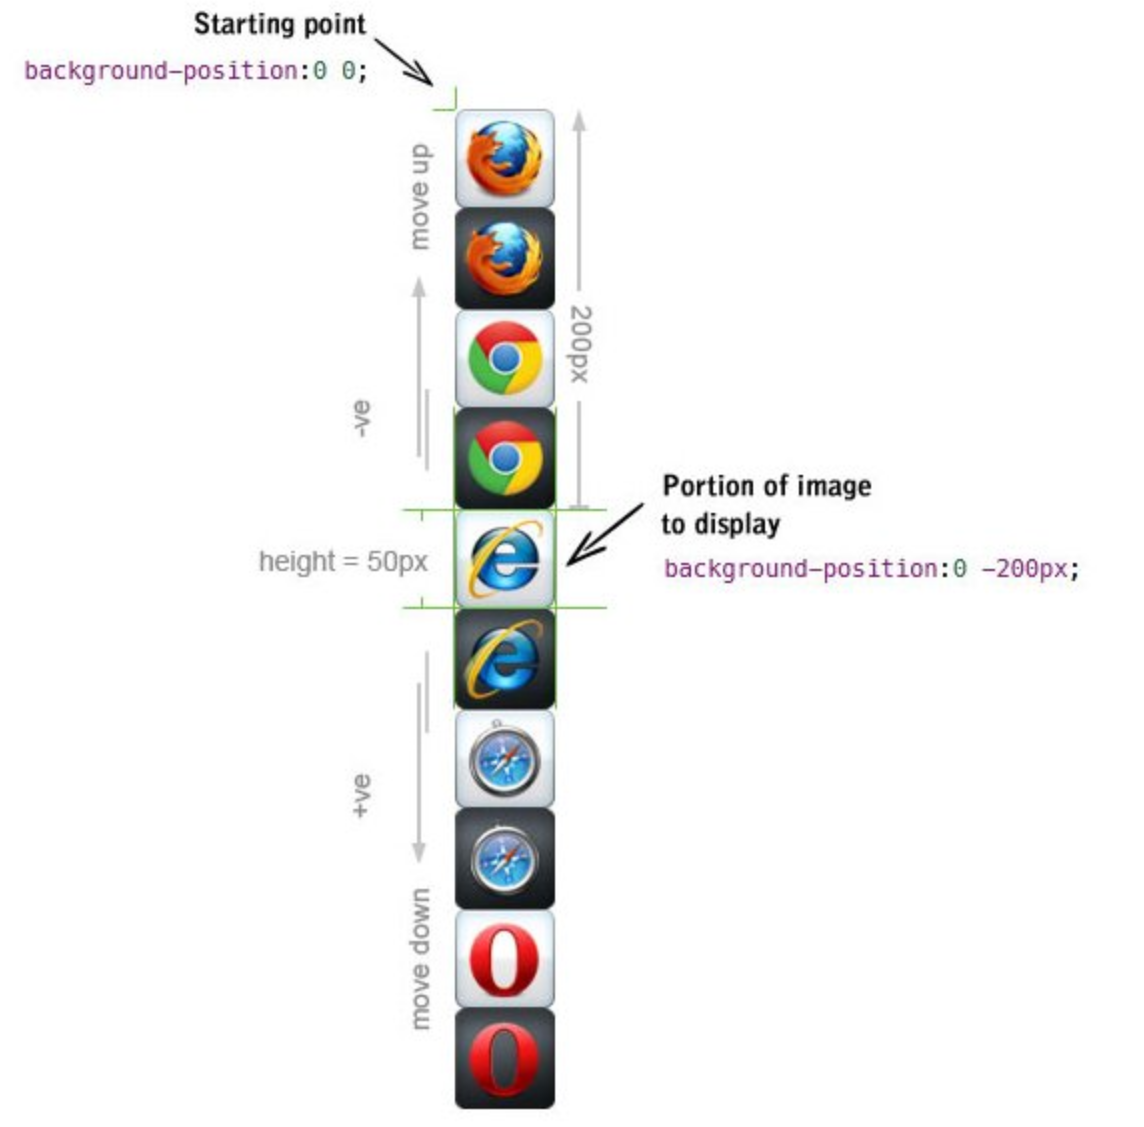
    background-position: 0 -200px; /* Icon background position in sprite */
}


The next question is how to get those pixel values for background-position? Let's see. The first value is the horizontal position of the background, and the second value is the vertical position of the background. Since the upper-left corner of the icon of Internet Explorer touches the left edge, therefore, its horizontal distance from the starting point, that is, image sprite's top-left corner is 0. Since, it is placed on the fifth position therefore its vertical distance from the image sprite starting point is 4 X 50px = 200px, since each icon's height is 50px.

For showing the Internet Explorer icon, we moved its upper-left corner to the starting point, i.e., image sprite's top-left corner (mySprite.png). Moreover, since the icon is placed at the vertical distance of 200px, we need to shift the complete background-image (mySprite.png) vertically up by 200px, for which we need to apply the value as a negative number, i.e., -200px. The negative value makes an icon go vertically up, and on the contrary, a positive value would move an icon down. However, the icon does not need a horizontal offset because there are no pixels before the Internet Explorer icon's upper-left corner. 

Tip: Simply play with the background-position property value in the upcoming examples, and you will learn how the offsets work easily.


Creating a Navigation Menu Using CSS Image Sprite

The previous section teaches you a method of displaying an individual icon from an image sprite. It is one of the easiest methods of using image sprites; now, let's go ahead and build a navigation menu with a rollover effect, as illustrated in [EXAMPLE - B].

Here we use the same sprite image (mySprite.png) for creating our navigation menu.


Foundation HTML for Navigation

Let's start by creating our navigation menu with an HTML unordered list.

Example:

<ul class="menu">
    <li class="firefox"><a href="#">Firefox</a></li>
    <li class="chrome"><a href="#">Chrome</a></li>
    <li class="ie"><a href="#">Explorer</a></li>
    <li class="opera"><a href="#">Opera</a></li>
    <li class="safari"><a href="#">Safari</a></li>
</ul>


Applying the CSS on Navigation

The next section describes a method of converting the simple unordered list given in the example mentioned above to a sprite image on the basis of navigation utilizing CSS.


Step 1: Resetting the List Structure

HTML unordered lists are displayed with bullets by default. Therefore, we need to remove the default bullets by setting the list-style-type attribute to none.

Example :

ul.menu {
    list-style-type: none;
}
ul.menu li {
    padding: 5px;
    font-size: 16px;
    font-family: "Trebuchet MS", Arial, sans-serif;
}


Step 2: Setting Common Properties for Each Links

The next step is to set all the common CSS properties that all links will share. Like, color, background-image, padding, display, etc.

Example :

ul.menu li a {
    height: 50px;
    line-height: 50px;
    display: inline-block;
    padding-left: 60px; /* To sift text off the background-image */
    color: #3E789F;
    background: url("images/mySprite.png") no-repeat; /* As all link share the same background-image */
}


Step 3: Setting Default State of Each Links

In this step, it is must to define a class for each menu item since each item in the image sprite has a distinct background-position. For instance, the Firefox icon's placement is at the starting point, i.e., image sprite's top-left corner, so there is no requirement to shift the background-image. Therefore, the horizontal and vertical position of the background, in this case, would be 0. Likewise, the background-position can be defined for other icons within the image sprite.

Example :

ul.menu li.firefox a {
    background-position: 0 0;
}
ul.menu li.chrome a {
    background-position: 0 -100px;
}
ul.menu li.ie a {
    background-position: 0 -200px;
}
ul.menu li.safari a {
    background-position: 0 -300px;
}
ul.menu li.opera a {
    background-position: 0 -400px;
}


Step 4: Adding Hover States of Links

Adding hover states of links has the same principle as adding the above links. You just need to move their upper-left corner to the image sprite's starting point (i.e., top-left corner) as done above. The background-position can be calculated using the below-mentioned formula: 

Vertical position of hover state = Vertical position of normal state - 50px

Since rollover images are right below the default, each icon's state and height are equal to 50px. The icon's hover state also doesn't need a horizontal offset, as there are no pixels before the upper-left corner.

Example :

ul.menu li.firefox a:hover {
    background-position: 0 -50px;
}
ul.menu li.chrome a:hover {
    background-position: 0 -150px;
}
ul.menu li.ie a:hover {
    background-position: 0 -250px;
}
ul.menu li.safari a:hover {
    background-position: 0 -350px;
}
ul.menu li.opera a:hover {
    background-position: 0 -450px;
}

The final HTML and CSS code after combining the entire process:

Example :

<!DOCTYPE html>
<html lang="en">
<head>
<meta charset="utf-8">
<title>Example of Sprite Navigation Menu</title>
<style>
    ul.menu {
        list-style-type: none;
    }
    ul.menu li {
        padding: 5px;
        font-size: 16px;
        font-family: "Trebuchet MS", Arial, sans-serif;
    }
    ul.menu li a {
        height: 50px;
        line-height: 50px;
        display: inline-block;
        padding-left: 60px; /* To sift text off the background-image */
        color: #3E789F;
        background: url("images/mySprite.png") no-repeat; /* As all link share the same background-image */
    }
    ul.menu li.firefox a {
        background-position: 0 0;
    }
    ul.menu li.chrome a {
        background-position: 0 -100px;
    }
    ul.menu li.ie a {
        background-position: 0 -200px;
    }
    ul.menu li.safari a {
        background-position: 0 -300px;
    }
    ul.menu li.opera a {
        background-position: 0 -400px;
    }
    ul.menu li.firefox a:hover {
        background-position: 0 -50px;
    }
    ul.menu li.chrome a:hover {
        background-position: 0 -150px;
    }
    ul.menu li.ie a:hover {
        background-position: 0 -250px;
    }
    ul.menu li.safari a:hover {
        background-position: 0 -350px;
    }
    ul.menu li.opera a:hover {
        background-position: 0 -450px;
    }
</style>
</head>
<body>
    <ul class="menu">
        <li class="firefox"><a href="#">Firefox</a></li>
        <li class="chrome"><a href="#">Chrome</a></li>
        <li class="ie"><a href="#">Explorer</a></li>
        <li class="opera"><a href="#">Opera</a></li>
        <li class="safari"><a href="#">Safari</a></li>
    </ul>
</body>
</html>


  • Prev
  • Next


-Advertisement-


DeveloperTutorial
[email protected] © 2022-2023 Developers Tutorial All rights reserved.

Follow Us

Facebook Twitter LinkedIn Printerest Reddit

Announcement

Its a big achivement for us, We make a partnership with TutorialWithExample.com for the better content of our users.

Still Need Help ?

Let us now about your issue and a Professional will reach you out.