
JS AJAX Requests
Welcome to another tutorial, here you will learn what Ajax is and how to implement it in JavaScript.
What is Ajax?
Ajax is an acronym and it stands for Asynchronous Javascript And XML. It is typically a means of loading data from the server and selectively updating parts of a web page without reloading the whole page.
However, what Ajax does is use the browser's built-in XMLHttpRequest (XHR) object to send and receive information to and from a web server asynchronously, in the background, without blocking the page or interfering with the user's experience. It has become popular that you hardly find an application that doesn't use Ajax to an extent. Some large-scale Ajax-driven online applications include Gmail, Facebook, Google Maps, Google Docs, YouTube, and so many other applications.
Note: Ajax has existed for a long time and is not a new technology, it might not be regarded as a technology at all. rather, it is just a term to describe the process of exchanging data from a web server asynchronously through JavaScript, without refreshing the page.
Tip: please, don’t be confused by the term X (i.e XML) in AJAX, as it is only there for historical reasons. However, other data exchange formats such as HTML, JSON, or plain text can be used instead of XML.
Understanding How Ajax Works
The JavaScript uses a special object built into the browser to perform Ajax communication such as XMLHttpRequest (XHR) object and to make HTTP requests to the server and receive data in response.
Every modern browser such as Chrome, Firefox, IE7+, Safari, and Opera; supports the XMLHttpRequest object.
The following illustrations show how Ajax communication works:
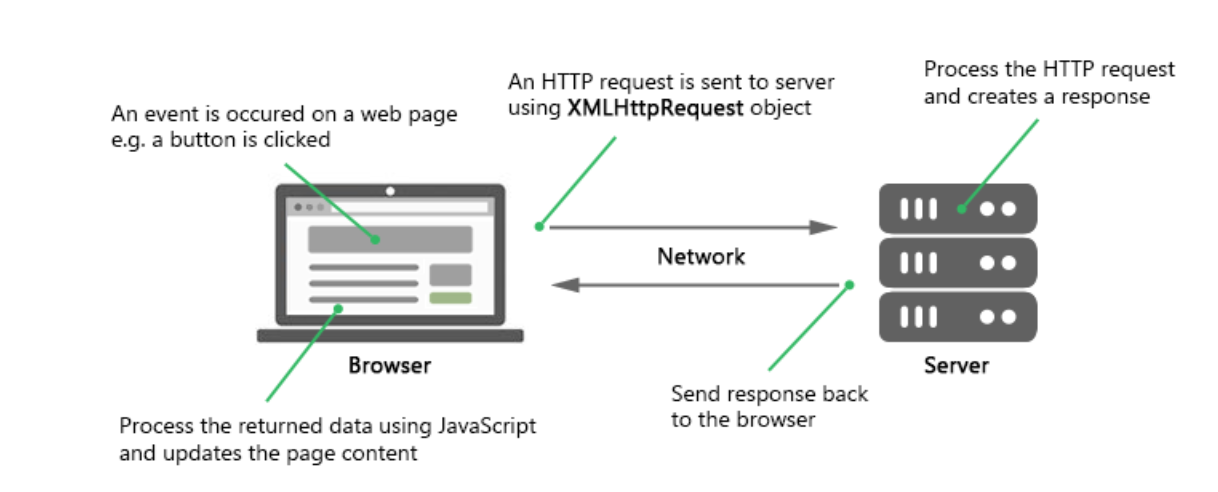
As already known, Ajax requests are usually asynchronous, execution of the script proceeds as soon as the Ajax request is sent. This means that the browser will not halt the script execution until the server response comes back.
In subsequent sections in this tutorial, we will discuss each step involved in this process one after the other:
Sending Request and Retrieving the Response
Before Ajax communication is performed between client and server, the first thing to do is to instantiate an XMLHttpRequest object, as shown in the example below:
var request = new XMLHttpRequest();The next step to take in sending the request to the server is to instantiate the newly-created request object with the help of the open() method of the XMLHttpRequest object.
The open() method basically accepts two parameters and they are; the HTTP request method to use, like "GET", "POST", etc., and the URL to send the request to, as shown below:
request.open("GET", "info.txt"); -Or- request.open("POST", "add-user.php");Tip: Your file can be of any kind, such as .txt or .xml, or server-side scripting files, like .php or .asp, which can perform some actions on the server (like inserting or reading data from the database) before sending the response back to the client.
Finally, you can send the request to the server with the send() method of the XMLHttpRequest object.
request.send(); -Or- request.send(body);Note: The send() method allows an optional body parameter which makes it possible for us to specify the request's body. This approach is primarily used for HTTP POST requests, as the HTTP GET request doesn't have a request body but just request headers.
However, the GET method is generally used to send a small amount of data to the server. While, the POST method is typically used to send a large amount of data, such as form data.
Furthermore, in the GET method, the data is sent as URL parameters. while, in the POST method, the data is sent to the server as a part of the HTTP request body. Data sent through the POST method will not visible be in the URL.
For a detailed comparison of the two, see the tutorial on HTTP GET vs. POST for a detailed comparison of these two methods.
Now, let’s look at how Ajax requests work.
Performing an Ajax GET Request
The GET request is normally used to get or retrieve information from the server that doesn't require any manipulation or change in the database. For instance, getting search results based on a term, getting user details based on their id or name, i.e.
The example will show you how to make an Ajax GET request in JavaScript.
<!DOCTYPE html>
<html lang="en">
<head>
<meta charset="utf-8">
<title>JavaScript Ajax GET Demo</title>
<script>
function displayFullName() {
    // Creating the XMLHttpRequest object
    var request = new XMLHttpRequest();

    // Instantiating the request object
    request.open("GET", "greet.php?fname=John&lname=Clark");

    // Defining event listener for readystatechange event
    request.onreadystatechange = function() {
        // Check if the request is compete and was successful
        if(this.readyState === 4 && this.status === 200) {
            // Inserting the response from server into an HTML element
            document.getElementById("result").innerHTML = this.responseText;
        }
    };

    // Sending the request to the server
    request.send();
}
</script>
</head>
<body>
    <div id="result">
        <p>Content of the result DIV box will be replaced by the server response</p>
    </div>
    <button type="button" onclick="displayFullName()">Display Full Name</button>
</body>
</html>
You should know that when the request is asynchronous, the send() method returns immediately after sending the request. Hence, you must confirm where the response currently stands in its lifecycle before processing it using the readyState property of the XMLHttpRequest object.
The status of an HTTP request is specified by the integer readyState. furthermore, the function assigned to the onreadystatechange event handler is invoked every time the readyState property changes. The possible values of the readyState property are summarized in the table below:
| Value | State | Description |
| 0 | UNSENT | An XMLHttpRequest object has been created, but the open() method hasn't been called yet (i.e. request not initialized). |
| 1 | OPENED | The open() method has been called (i.e. server connection established). |
| 2 | HEADERS_RECEIVED | The send() method has been called (i.e. server has received the request). |
| 3 | LOADING | The server is processing the request. |
| 4 | DONE | The request has been processed and the response is ready. |
Note: Theoretically, the readystatechange event is designed to trigger every time the readyState property changes. However, most browsers do not fire this event when readyState changes to 0 or 1. But, all browsers fire this event when readyState changes to 4.
The status property returns the numerical HTTP status code of the XMLHttpRequest's response. Below are lists of common HTTP status codes :
- 200: OK. The server successfully processed the request.
- 404: Not Found. The server can't find the requested page.
- 503 : Service Unavailable. The server is temporarily unavailable.
You can check out the HTTP status codes reference for a complete list of response codes.
This is the code from our "greet.php" file that allows you to create the full name of a person by joining their first name and last name and outputs a greeting message.
<?php
if(isset($_GET["fname"]) && isset($_GET["lname"])) {
    $fname = htmlspecialchars($_GET["fname"]);
    $lname = htmlspecialchars($_GET["lname"]);

    // Creating full name by joining first and last name
    $fullname = $fname . " " . $lname;

    // Displaying a welcome message
    echo "Hello, $fullname! Welcome to our website.";
} else {
    echo "Hi there! Welcome to our website.";
}
?>
Performing an Ajax POST Request
The POST method is a method typically used to submit form data to the web server.
The example below will show you how to submit form data to the server using Ajax.
<!DOCTYPE html>
<html lang="en">
<head>
<meta charset="utf-8">
<title>JavaScript Ajax POST Demo</title>
<script>
function postComment() {
    // Creating the XMLHttpRequest object
    var request = new XMLHttpRequest();

    // Instantiating the request object
    request.open("POST", "confirmation.php");

    // Defining event listener for readystatechange event
    request.onreadystatechange = function() {
        // Check if the request is compete and was successful
        if(this.readyState === 4 && this.status === 200) {
            // Inserting the response from server into an HTML element
            document.getElementById("result").innerHTML = this.responseText;
        }
    };

    // Retrieving the form data
    var myForm = document.getElementById("myForm");
    var formData = new FormData(myForm);

    // Sending the request to the server
    request.send(formData);
}
</script>
</head>
<body>
    <form id="myForm">
        <label>Name:</label>
        <div><input type="text" name="name"></div>
        <br>
        <label>Comment:</label>
        <div><textarea name="comment"></textarea></div>
        <p><button type="button" onclick="postComment()">Post Comment</button></p>
    </form>
    <div id="result">
        <p>Content of the result DIV box will be replaced by the server response</p>
    </div>
</body>
</html>
If you are not making use of the FormData object to send form data, for instance, when you are sending the form data to the server in the query string format (i.e request.send(key1=value1&key2=value2)), then you have to explicitly set the request header using setRequestHeader() method, like this:
request.setRequestHeader("Content-type", "application/x-www-form-urlencoded");The setRequestHeader() method, must be called after calling open(), but before calling send(). Some frequently used request headers are: application/x-www-form-urlencoded, multipart/form-data, application/json, application/xml, text/plain, text/html, etc.
Note: The FormData object brings about a simple way to construct a set of key/value pairs representing form fields and their values which can be sent using XMLHttpRequest.send() method. The transmitted data is of the same format as the form submits () method would use to send the data if the form's encoding type were set to multipart/form-data.
This is the code of our ‘confirmation.php’ file that easily outputs the values submitted by the user.
<?php
if($_SERVER["REQUEST_METHOD"] == "POST") {
    $name = htmlspecialchars(trim($_POST["name"]));
    $comment = htmlspecialchars(trim($_POST["comment"]));

    // Check if form fields values are empty
    if(!empty($name) && !empty($comment)) {
        echo "<p>Hi, <b>$name</b>. Your comment has been received successfully.<p>";
        echo "<p>Here's the comment that you've entered: <b>$comment</b></p>";
    } else {
        echo "<p>Please fill all the fields in the form!</p>";
    }
} else {
    echo "<p>Something went wrong. Please try again.</p>";
}
?>
As a result of security reasons, most browsers do not allow you to make cross-domain Ajax requests. This is because you can only make Ajax requests to URLs from the same domain as the original page, take, for instance, if your application is running on the domain ‘mysite.com’, you cannot make Ajax requests to 'othersite.com' or any other domain. This is known as the same-origin policy.
More importantly, you can load images, JS files, style sheets, and other resources from any domain.
Tip: You should check out the jQuery Ajax methods for quick and easy Ajax implementation. The jQuery framework makes it very convenient to implement Ajax functionality.